virtuOSo control planeVMs · Stacks · Access · Networking
On-Prem
AWS
Instead of piecing together separate tools for virtualization, orchestration, cloud, and automation, virtuOSo keeps the entire workflow in one system.
Everything you need to run VMs
A complete VM management platform spanning on-prem and cloud. Run it on a single server or scale to AWS.
Hybrid Cloud
Manage on-prem KVM and AWS EC2 instances from the same dashboard. Launch cloud VMs alongside your homelab with unified controls.
Apps Marketplace
One-click deployment of Kubernetes clusters, Docker hosts, Gitea, databases, and monitoring stacks. Scale K8s workers up and down from the UI.
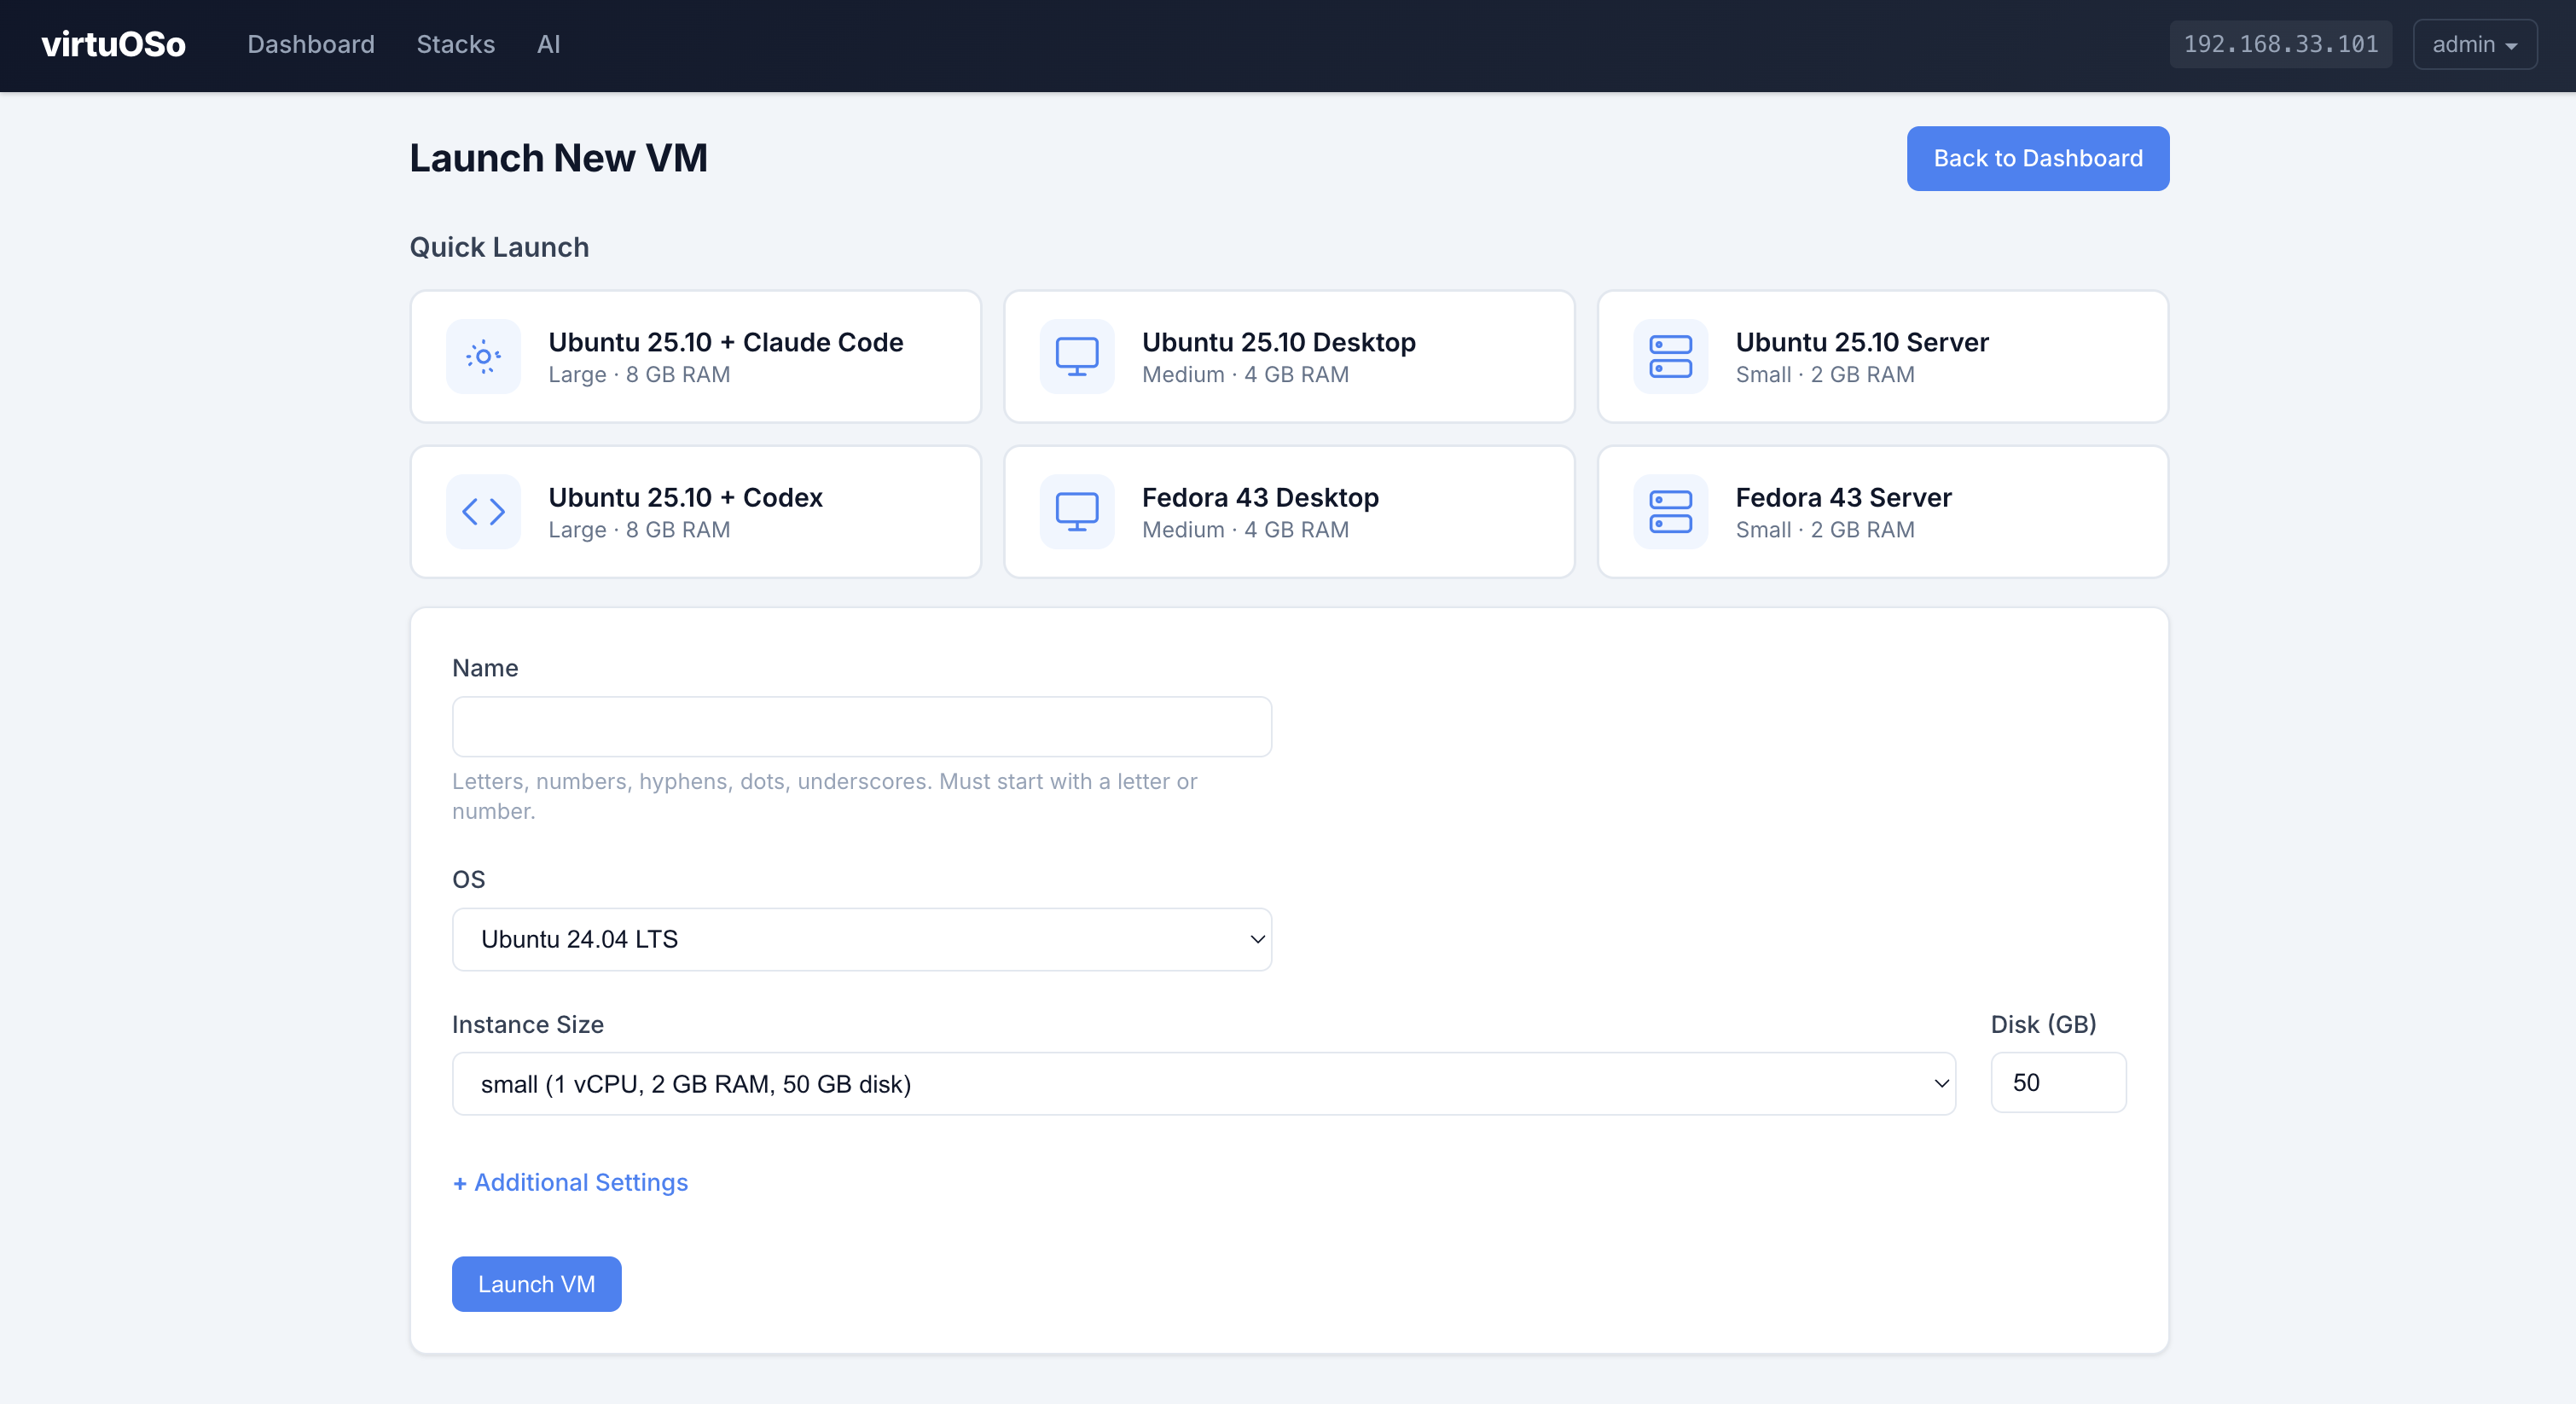
Quick Launch
Spin up a VM in one click with pre-configured defaults. The fastest way to get a test environment running.
Multi-VM Stacks
Define multi-VM deployments as YAML templates. Deploy and tear down entire environments together.
Terraform Provider
Infrastructure-as-code for your homelab. Manage VMs, SSH keys, and access grants with Terraform.
Browser-Based Access
SSH shell, serial console, and VNC desktop — all from your browser. No client software needed.
Custom Images
Boot from cloud images, uploaded ISOs, or QCOW2 disk images. Full support for Linux and Windows guests with automatic device model selection.
VPN & Remote Access
Built-in Tailscale integration for secure remote access to your VMs from anywhere. Connect your server to a tailnet with one click.
AI Assistant & MCP
Use Claude Code or OpenAI Codex from the built-in chat UI. virtuOSo exposes typed VM tools over MCP for agent-driven infrastructure.
See it in action
A clean, intuitive interface for managing your entire VM fleet from the browser.
See all your VMs at a glance
Launch any major distribution
Cloud images download automatically. Upload custom ISOs or QCOW2 disk images for any OS, including Windows.
Ubuntu
25.1024.04 LTS22.04 LTS
Desktop available · User: ubuntu
Fedora
43
Desktop available · User: fedora
Amazon Linux
2023
User: ec2-user
Custom Images
ISOQCOW2
ISOs & QCOW2 · Linux & Windows
Instance Sizes
Size
vCPUs
Memory
Default Disk
micro
1
1 GB
50 GB
small
1
2 GB
50 GB
medium
2
4 GB
50 GB
large
2
8 GB
100 GB
xlarge
4
16 GB
100 GB
2xlarge
4
32 GB
200 GB
4xlarge
8
64 GB
200 GB
8xlarge
16
128 GB
500 GB
Deploy complete environments with Stacks
Define multi-VM environments as simple YAML templates. Launch, update, and tear them down as a single unit.
One definition. Multiple VMs. Fully wired together at deploy time.
Launch environments in the right order automaticallyDependencies start first, and virtuOSo waits for required services to come online before continuing.
Wire services together without manual setupUse ${vm.name.ip} and ${secret.KEY} to inject runtime values before dependent VMs boot.
Inject secrets safely at deploy timeKeep sensitive values out of your YAML and let virtuOSo handle secure substitution.
Tear everything down as a single unitCreate, redeploy, and destroy complete environments without managing each VM separately.
stack.yaml
vms:
- name: databaseos: ubuntu-24.04size: medium
- name: webos: ubuntu-24.04size: smalldepends_on: [database]
user-script: |# Injected before the VM boots
echo "DB_HOST=${vm.database.ip}" >> /etc/environment
What happens when you deploy it
database starts first
virtuOSo waits for it to get an IP address
web starts next with DB_HOST already configured
Automate everything
Choose the control surface that fits the job: direct API calls, Terraform plans, or AI assistants connected through the built-in MCP server.
REST API
Complete VM lifecycle management via JSON endpoints. Create API keys from the web UI and use them with any HTTP client.
python
import requests
API = "https://your-server/api/v1"
KEY = "vmk_..."
s = requests.Session()
s.headers["Authorization"] = f"Bearer {KEY}"# Launch a VM
resp = s.post(f"{API}/vms", json={
"name": "web-01",
"os": "ubuntu-24.04",
"size": "medium",
})
print(resp.json())
GETPOSTPUTDEL25+ endpoints
Terraform Provider
Declare your infrastructure in HCL. The provider manages VMs, SSH keys, and access grants with full lifecycle support.
The built-in AI Assistant supports Claude Code and OpenAI Codex.
codex / claude
Hello! I'm your virtuOSo AI assistant.

I can help you manage VMs, generate Terraform configs, create Stack definitions, and more.

What would you like to do?
Claude CodeOpenAI Codex15 MCP tools
Tailscale VPN
Built-in Tailscale integration for secure remote access to your VMs from anywhere. Connect your server to a tailnet and route VM subnets automatically.
AI-Safe Guardrails
Credentials stay out of AI responses, delete protection is respected, and ambiguous destructive prompts are treated as conversation instead of bulk VM operations.
Delete Protection
Guard important VMs against accidental deletion. Protection must be explicitly disabled before a VM can be removed.
Cloud-Init & Secrets
Run custom scripts on first boot. Inject encrypted secrets into VMs at deploy time with AES-256-GCM encryption at rest.
Get started
virtuOSo ships as a bootable ISO for on-prem servers. Install on dedicated hardware and manage VMs from your browser in minutes. Optionally connect AWS for hybrid cloud.
System Requirements: x86_64 CPU · UEFI boot · 16 GB+ RAM · SSD recommended
1
Download & Install
Download the virtuOSo ISO and install it on dedicated hardware.
2
Open the UI
Navigate to your server's IP in a browser. Log in with the admin credentials created during install.
3
Launch a VM
Click Launch, pick an OS and size, and your VM will be running in seconds. Use Quick Launch for one-click creation.
virtuOSo is a hybrid infrastructure platform for homelabs and cloud. It manages VMs across on-prem KVM/libvirt and AWS EC2 from a single dashboard, with a built-in apps marketplace, REST API, Terraform provider, and AI assistant.
Key features:
Hybrid cloud: manage on-prem KVM and AWS EC2 from one dashboard
Launch from cloud images, custom ISOs, or QCOW2 disk images (Linux & Windows)
Browser-based SSH shell, serial console, and VNC desktop access
Multi-VM stacks with YAML templates and dependency ordering
Built-in AI Assistant with Claude Code and OpenAI Codex support
Tailscale VPN integration for secure remote access
REST API and Terraform provider for automation
Multi-user access control with per-VM permissions
AI Assistant
The /ai page provides a built-in chat interface backed by the virtuOSo MCP server. It supports both Claude Code and OpenAI Codex, with provider-specific login handled from the web UI.
Structured tools — the AI calls typed VM tools like list_vms, launch_vm, and change_vm_network
Built-in auth flows — Claude Code uses claude auth login; Codex uses codex login --device-auth
Guardrails — credentials are never exposed to the AI, bulk deletion is blocked, and delete protection is enforced
Dashboard
The dashboard (/vms) shows all your virtual machines with live status updates. Each VM row displays:
Name — click to open the VM detail page
State — running, shutoff, creating, or paused
IP address — appears once the VM is online
Resources — vCPUs, memory, disk usage
Cloud-init status — tracks first-boot provisioning progress
The dashboard auto-refreshes every few seconds via HTMX polling so you can watch VMs boot in real time.
Launching VMs
Navigate to Launch to create a new VM. Fill in the form:
Name — alphanumeric characters, hyphens, underscores, and dots (1-63 chars)
OS — choose from Ubuntu 25.10, Ubuntu 24.04 LTS, Ubuntu 22.04 LTS, Fedora 43, Amazon Linux 2023, Custom ISO, or Custom QCOW2
SSH Key — select a key from your profile or paste one directly
User Script — shell commands to run on first boot via cloud-init
Desktop — installs a desktop environment and enables VNC
Bridged — places the VM on the LAN instead of NAT
Booting from ISO
To install an OS manually, select an ISO from the dropdown instead of a cloud image. ISOs can be uploaded via Settings (Storage tab). ISO-booted VMs automatically get VNC enabled so you can interact with the installer.
Booting from QCOW2
Select "Custom QCOW2" to boot from an uploaded QCOW2 disk image. Upload QCOW2 files via Settings (Storage tab). Choose a Guest OS type (Linux or Windows) — Windows uses SATA/e1000e devices and TPM 2.0, while Linux uses virtio for better performance. Each VM gets a copy-on-write overlay, leaving the base image untouched.
Tip: After launching, a password is generated and shown once. Copy it before navigating away. You can also view it later on the VM detail page.
VM Management
Click a VM name on the dashboard to open its detail page. Available actions:
Delete — permanently destroys the VM and its disk image
Resize Disk — grow the disk while the VM is shut off (disks can only be increased, not shrunk)
Autostart — toggle whether the VM starts automatically when the host boots
Delete Protection — prevent accidental deletion until protection is disabled
Change Network — switch between NAT and bridged networking (requires VM to be shut off)
The detail page also shows the VM password, SSH command, OS info, resource usage, and cloud-init status.
Quick Launch
The dashboard includes quick-launch buttons for common VM configurations. Click a quick-launch option to instantly create a VM with pre-configured settings (OS, size, and name are auto-generated). This is the fastest way to spin up a VM for testing.
Networking
VMs can use one of two network modes:
NAT (default) — VMs get an IP on the 192.168.122.x subnet via libvirt's default network. VMs can reach the internet but are not directly accessible from the LAN
Bridged — VMs get an IP directly from your router's DHCP, appearing as regular devices on your LAN. Requires a host bridge (br0) to be configured on the server
You can switch a VM's network mode from the VM detail page while it's shut off. The admin can configure the default network mode and bridge settings in Settings.
Shell & Console Access
virtuOSo provides three ways to access VMs from the browser:
SSH Shell — browser-based SSH terminal. Uses the VM's IP and default user (e.g., ubuntu for Ubuntu, fedora for Fedora, ec2-user for Amazon Linux). Requires the VM to be running with an IP assigned
Serial Console — direct serial console connection via libvirt. Works even when networking is down or the VM hasn't finished booting. Useful for debugging boot issues
VNC — graphical desktop access. Available when the VM was launched with VNC or desktop mode enabled. Required for ISO-booted VMs to interact with the OS installer
SSH Keys — upload public keys that can be injected into VMs at launch. Supports ssh-rsa, ssh-ed25519, and ecdsa-sha2 formats
API Keys — create bearer tokens for the REST API. Keys are shown once at creation and cannot be retrieved later
Secrets — encrypted key-value pairs that can be referenced in stack templates using ${secret.NAME} syntax. Values are encrypted at rest with AES-256-GCM
Tailscale — if configured by the admin, VMs are accessible over your Tailscale network
Stacks let you define multi-VM deployments as a single YAML template and manage them as a unit. Instead of launching VMs one at a time, you describe all the VMs you need in a template, then deploy and tear them down together.
A stack has three components:
Name — a unique identifier for the stack (same rules as VM names)
Template — a YAML document defining the VMs
State — tracked automatically: undeployed, deployed, or partial
VM names are automatically prefixed with the stack name. For example, a stack called my-app with a VM named web creates a VM called my-app-web.
Template Format
Templates are YAML documents with a single top-level key vms containing a list of VM specifications:
VM name within the stack. Combined with the stack name to form the full VM name ({stack}-{name}). Must be unique within the template.
osrequired
string
Yes
—
OS image ID. Available options: ubuntu-24.04, ubuntu-22.04, ubuntu-25.10, fedora-43, amazon-2023. Append +desktop for a desktop environment (e.g. ubuntu-24.04+desktop).
Override disk size in GB. When set, overrides the default disk size for the chosen instance size.
user-scriptoptional
string
No
—
Shell commands to run on first boot (via cloud-init). Use YAML | for multi-line scripts. Also accepts user_script.
ssh-keyoptional
string
No
—
SSH public key to inject into the VM. Also accepts ssh_key.
vncoptional
bool
No
false
Enable VNC graphics. Automatically enabled when desktop is true.
desktopoptional
bool
No
false
Install a desktop environment. Implies vnc: true. Can also be set by appending +desktop to the os value.
depends_onoptional
list
No
[]
List of VM names (from this template) that must be launched and have an IP address before this VM starts. Used to ensure ${vm.X.ip} variables resolve to real IPs. Also accepts depends-on.
Template Variables
Use variables in user-script to reference other VMs in the same stack. Variables are resolved at deploy time.
Variable
Resolves To
When
${vm.SPECNAME.name}
Full prefixed VM name (e.g. mystack-database)
Deploy time (immediate)
${vm.SPECNAME.ip}
Actual IP address of the sibling VM (e.g. 192.168.122.237)
Deploy time (requires depends_on — the dependency is launched first and its IP is collected before this VM starts)
${secret.NAME}
Decrypted value of the secret named NAME
Deploy time (secret must exist in Profile > Secrets or as a per-stack secret)
SPECNAME is the name field of a VM in the same stack template (not the full prefixed name).
Example — web server connecting to database
vms:
  - name: database
    os: ubuntu-24.04
    size: medium
    user-script: |
      apt-get update
      apt-get install -y postgresql

  - name: web
    os: ubuntu-24.04
    size: small
    depends_on: [database]
    user-script: |
      apt-get update
      apt-get install -y nginx
      # database IP is substituted directly by the host before cloud-init
      echo "DB_HOST=${vm.database.ip}" >> /etc/environment
      echo "DB_VM=${vm.database.name}" >> /etc/environment
Note: To use ${vm.X.ip}, add depends_on: [X] to the VM that needs the IP. The host launches dependencies first, waits for them to get an IP (up to 2 minutes), then substitutes the actual IP address directly into the user-script before the dependent VM is created. No guest-side DNS resolution is needed. Name variables (${vm.X.name}) are replaced instantly and don't require depends_on.
Secrets
Secrets let you inject sensitive values (database passwords, API keys, tokens) into VM user-scripts without hardcoding them in the YAML template. Secret values are encrypted at rest using AES-256-GCM and only decrypted at deploy time.
Scopes
Global secrets — set in Profile > Secrets. Available to all your stacks.
Per-stack secrets — set on the stack detail page > Secrets tab. Override global secrets of the same name for that specific stack.
At deploy time, global secrets are loaded first, then per-stack secrets overlay them. If a per-stack secret has the same name as a global secret, the per-stack value wins.
Usage
Reference secrets in user-script using ${secret.NAME} syntax:
Retrieve the decrypted value of a per-stack secret. Response: {"value": "the-secret-value"}
PUT/api/v1/stacks/{name}/secrets/{id}API Key
Update the value of a per-stack secret. Same request body as global update.
DELETE/api/v1/stacks/{name}/secrets/{id}API Key
Delete a per-stack secret by ID.
Available OS Images
Use these values for the os field:
OS ID
Name
Default User
Desktop Available
ubuntu-25.10
Ubuntu 25.10
ubuntu
Yes — ubuntu-25.10+desktop
ubuntu-24.04
Ubuntu 24.04 LTS
ubuntu
Yes — ubuntu-24.04+desktop
ubuntu-22.04
Ubuntu 22.04 LTS
ubuntu
Yes — ubuntu-22.04+desktop
fedora-43
Fedora 43
fedora
Yes — fedora-43+desktop
amazon-2023
Amazon Linux 2023
ec2-user
No
Tip: The default user is the SSH login username for each OS. For Ubuntu VMs, SSH in with ssh ubuntu@<ip>. For Fedora, use fedora. For Amazon Linux, use ec2-user. A random password is also generated for each VM at deploy time.
Examples
Minimal — two VMs with defaults
vms:
  - name: app
    os: ubuntu-24.04
    size: small
  - name: db
    os: ubuntu-24.04
    size: medium
The stack name and template are saved to the database. No VMs are launched yet.
Deploy
VMs are launched in dependency order. VMs with no depends_on start first (in parallel), then VMs that depend on them, and so on. Each VM gets an auto-generated password. Non-admin users are automatically granted access to the VMs.
Update Template
The template YAML is updated in the database. Already-deployed VMs are not affected — changes take effect on the next deploy.
Tear Down
All VMs belonging to the stack are deleted (destroyed + disk removed). The stack itself remains so you can redeploy later.
Delete Stack
Tears down all VMs (if any) and then removes the stack from the database entirely.
Note: Deploying a stack does not skip VMs that already exist. If you need to redeploy, tear down first, then deploy again.
REST API
Stacks can be managed programmatically via the REST API. All endpoints require an API key (Authorization: Bearer vmk_...).
List Stacks
GET/api/v1/stacksAPI Key
Returns all stacks visible to the authenticated user (admins see all, users see their own).
Deletes all VMs belonging to the stack. The stack itself is preserved.
Response 200 OK: {"ok": true}
Delete Stack
DELETE/api/v1/stacks/{name}API Key
Tears down all VMs and removes the stack from the database.
Response 200 OK: {"ok": true}
Template Library
The template library lets you save stack templates for reuse. Saved templates persist independently of stacks, so you can delete a stack and still reuse its template later.
Saving a Template
On any stack detail page, use the Save as Template form below the YAML editor. Enter a name for the template and click save. The stack's current YAML is saved to your personal library.
Loading a Saved Template
When creating a new stack, a dropdown appears above the YAML editor if you have saved templates. Select a template and click Load to populate the editor with the saved YAML. You can edit it before creating the stack.
Deleting a Saved Template
On the new stack page, select a template from the dropdown and click the Delete button to remove it from your library.
Template Library API
GET/api/v1/stack-templatesAPI Key
Returns all saved templates belonging to the authenticated user.
Boot a VM from a custom ISO file. Upload ISOs via the Settings page (Storage tab), then reference the full path. VNC is automatically enabled for ISO boots.
Use bridged: true to place the VM on the LAN with a real IP from your router's DHCP, instead of the default NAT (192.168.122.x). Requires a host bridge (br0) to be configured on the server.
#!/usr/bin/env python3
"""virtuOSo API client example — launch a VM, wait for it, then SSH in."""
import requests, time

API = "https://your-server/api/v1"
KEY = "YOUR_API_KEY"
s = requests.Session()
s.headers["Authorization"] = f"Bearer {KEY}"
s.verify = False

# Launch a VM
resp = s.post(f"{API}/vms", json={
    "name": "test-vm",
    "size": "small",
    "os": "ubuntu-24.04",
})
print(f"Launched: {resp.json()}")

# Poll until it's running and has an IP
for _ in range(60):
    vm = s.get(f"{API}/vms/test-vm").json()
    if vm.get("ip") and vm["state"] == "running" and vm.get("cloud_init") == "done":
        print(f"Ready! IP: {vm['ip']}, password: {vm.get('password', 'N/A')}")
        break
    time.sleep(5)
else:
    print("Timed out waiting for VM")

# Clean up
# s.delete(f"{API}/vms/test-vm")
Error Format
All errors return JSON with error and status fields:
{"error": "VM not found", "status": 404}
Status
Meaning
400
Bad request (invalid input)
401
Unauthorized (missing or invalid auth)
403
Forbidden (admin access required)
404
Not found
409
Conflict (duplicate name)
500
Internal server error
Quick Reference
Method
Endpoint
Auth
Description
POST
/api/v1/auth/apikeys
Session
Create API key
GET
/api/v1/auth/apikeys
Session
List API keys
DELETE
/api/v1/auth/apikeys/{id}
Session
Delete API key
GET
/api/v1/me
API Key
Current user info
GET
/api/v1/vms
API Key
List VMs
POST
/api/v1/vms
API Key
Launch VM
GET
/api/v1/vms/{name}
API Key
Get VM details
DELETE
/api/v1/vms/{name}
API Key
Delete VM
POST
/api/v1/vms/{name}/start
API Key
Start VM
POST
/api/v1/vms/{name}/stop
API Key
Graceful shutdown
POST
/api/v1/vms/{name}/kill
API Key
Force stop
POST
/api/v1/vms/{name}/restart
API Key
Reboot VM
POST
/api/v1/vms/{name}/resize
API Key
Resize disk
PUT
/api/v1/vms/{name}/autostart
API Key
Set autostart
PUT
/api/v1/vms/{name}/network
API Key
Change network mode
PUT
/api/v1/vms/{name}/protected
API Key
Set delete protection
GET
/api/v1/users
Admin
List users
POST
/api/v1/users
Admin
Create user
GET
/api/v1/users/{id}
Admin
Get user
DELETE
/api/v1/users/{id}
Admin
Delete user
PUT
/api/v1/users/{id}/password
Admin
Reset password
GET
/api/v1/vms/{name}/access
Admin
List VM access
POST
/api/v1/vms/{name}/access
Admin
Grant access
DELETE
/api/v1/vms/{name}/access/{user_id}
Admin
Revoke access
GET
/api/v1/sshkeys
API Key
List SSH keys
POST
/api/v1/sshkeys
API Key
Add SSH key
DELETE
/api/v1/sshkeys/{id}
API Key
Delete SSH key
API Keys
API key management uses session cookie auth (not Bearer tokens). Create keys from the Profile page or via these endpoints.
The network field is "default" for NAT or "bridge:br0" for bridged networking. The protected field indicates delete protection — protected VMs cannot be deleted until protection is disabled.
Launch VM
POST/api/v1/vmsAPI Key
Launches asynchronously. Returns immediately with status "creating".
Field
Type
Required
Default
Description
name
string
Yes
—
VM name (alphanumeric + hyphens)
size
string
No
small
micro, small, medium, large, xlarge
os
string
No*
—
ubuntu-24.04, ubuntu-22.04, ubuntu-25.10, fedora-43, amazon-2023 (append +desktop for GUI). Required unless iso is set
iso
string
No
—
Absolute path to an ISO file on the server. When set, the VM boots from the ISO instead of a cloud image (os is ignored, VNC is auto-enabled). ISOs uploaded via Settings are stored in /var/lib/vm-lab/vms/isos/
ssh_key
string
No
—
SSH public key to inject
disk_gb
int
No
20
Disk size in GB
password
string
No
auto
VM user password
vnc
bool
No
false
Enable VNC graphics
desktop
bool
No
false
Desktop environment (implies VNC)
user_script
string
No
—
Cloud-init script for first boot
bridged
bool
No
false
Use bridged networking instead of NAT. The VM gets an IP directly from the LAN router's DHCP. Requires a host bridge (br0) to be configured
All attributes can be set via environment variables as an alternative to hardcoding in config files.
Resource: virtuoso_vm
Manages a virtual machine. Most fields are immutable — changing them destroys and recreates the VM.
resource "virtuoso_vm" "web" {
  name      = "web-server"
  size      = "medium"
  os        = "ubuntu-24.04"
  disk_gb   = 40
  ssh_key   = virtuoso_ssh_key.deploy.public_key
  started   = true
  autostart = true
}
Arguments
Attribute
Type
Description
namerequiredforce new
String
VM name (1-63 chars, alphanumeric/hyphens/underscores/dots)
osoptionalforce new
String
OS image: ubuntu-24.04 (default), ubuntu-22.04, ubuntu-25.10, fedora-43, amazon-2023. Ignored when iso is set
isooptionalforce new
String
Absolute path to an ISO file on the server. When set, the VM boots from the ISO instead of a cloud image (os is ignored, VNC is auto-enabled). Upload ISOs via Settings > Storage; they are stored at /var/lib/vm-lab/vms/isos/
sizeoptionalforce new
String
micro (1 vCPU/1 GB), small (1/2 GB), medium (2/4 GB), large (2/8 GB), xlarge (4/16 GB). Default: small
ssh_keyoptionalforce new
String
SSH public key to inject
disk_gboptional
Int
Disk size in GB. Can be increased in-place; cannot be shrunk
passwordoptionalsensitiveforce new
String
VM password. Auto-generated if omitted
vncoptionalforce new
Bool
Enable VNC graphics
desktopoptionalforce new
Bool
Install desktop environment (implies VNC)
user_scriptoptionalforce new
String
Shell commands to run on first boot via cloud-init
bridgedoptional
Bool
Use bridged networking (VM gets a LAN IP from router DHCP) instead of NAT. Default: false. Updateable in-place (stops VM, switches network, restarts automatically)
autostartoptional
Bool
Start VM automatically on host boot. Default: false. Updateable in-place
protectedoptional
Bool
Delete protection. When enabled, the VM cannot be deleted until protection is disabled. Default: false. Updateable in-place. Terraform auto-unprotects before destroy
startedoptional
Bool
Whether the VM should be running. Default: true. Updateable in-place
Read-Only Attributes
Attribute
Type
Description
ip
String
VM IP address
state
String
VM state: running, shutoff, creating
vcpus
Int
Number of virtual CPUs
memory_mb
Int
Memory in MB
disk_cap_gb
Float
Disk capacity in GB
disk_used_gb
Float
Disk used in GB
has_vnc
Bool
Whether VNC is available
cloud_init
String
Cloud-init status (running, done, error)
network
String
Network identifier: "default" for NAT or "bridge:br0" for bridged
os_id
String
OS identifier from server
passwordsensitive
String
VM password (captured at creation)
Update Behavior
In-place updates (no VM replacement):
autostart — toggles autostart on/off
started — starts or gracefully stops the VM
disk_gb — grows the disk (stops VM, resizes, restarts automatically)
bridged — switches between NAT and bridged networking (stops VM, switches, restarts automatically)
protected — enables or disables delete protection (Terraform auto-unprotects before terraform destroy)
Disk resize requires a VM restart. The provider handles the stop → resize → start sequence automatically. Disks can only be grown, not shrunk.
Import
terraform import virtuoso_vm.web web-server
Import by VM name. Config-only fields (size, os, etc.) will be empty after import — fill them in or use ignore_changes.
Resource: virtuoso_ssh_key
Manages an SSH public key associated with your account. Immutable — any change recreates the key.
The AWS provider lets you launch and manage EC2 instances from the same dashboard as your on-prem KVM VMs. All apps (Compute, Docker, Kubernetes, databases, monitoring) work on both providers. Configure AWS credentials in Settings, then select AWS as the provider when creating apps.
Setup
Create an IAM User or Role with the policy below
Go to Settings > AWS and enter your Access Key ID, Secret Access Key, and default region
Launch any app and select AWS as the provider
Changes take effect immediately — no restart required.
IAM Policy
VirtuOSo needs EC2, SSM, and IAM permissions. Create an IAM user with this policy:
VirtuOSo automatically creates a VPC when you select a region with no VPCs. The auto-created VPC includes:
CIDR 10.0.0.0/16 with DNS hostnames enabled
2 public subnets across 2 availability zones
Internet gateway with default route
Auto-assign public IPs on both subnets
You can also use an existing VPC — just select it from the dropdown when creating an app.
Cost note: VPCs, subnets, internet gateways, and route tables have no hourly charges. You only pay for EC2 instances.
Launching Instances
When AWS is configured, app create forms show a Provider dropdown. Select AWS to configure:
Region — AWS region (defaults to your configured region)
VPC & Subnet — dynamically loaded from your AWS account
Instance Type — EC2 instance types (t3.micro through t3.2xlarge)
Firewall Rules — per-instance security group rules with My IP auto-detection, custom CIDR, or public access
User Data — optional shell commands to run on first boot
SSH port 22 is included by default. Security groups are created per-instance and per-user for traffic isolation.
Tailscale on AWS
When Tailscale is configured in Settings, AWS instances automatically join your tailnet with Tailscale SSH enabled. This lets you SSH into cloud instances without managing SSH keys or opening additional ports.
Instances register with hostname <user>-<app>-<instance>
SSH via Tailscale IP works without public internet exposure
You can use private subnets (no internet gateway) with Tailscale
Kubernetes on AWS
The Kubernetes app works identically on AWS. Select AWS as the provider when creating a cluster. Worker nodes can be scaled up/down from the cluster detail page — each worker is a separate EC2 instance in the same VPC.
Workers join automatically via k3s and are drained before removal
Kubeconfig available from the cluster detail page
With Tailscale, access the K8s API via tailnet without opening port 6443 publicly
virtuOSo includes a built-in Model Context Protocol server so AI assistants can manage VMs through typed JSON tools instead of parsing shell output. The MCP server runs as vm mcp-serve and exposes structured VM lifecycle, discovery, and configuration operations.
AI Assistant
The /ai page provides a built-in chat interface with provider tabs for Claude Code and OpenAI Codex. Authentication is handled from the web UI using each provider's CLI login flow.
Claude Code — signs in with claude auth login
Codex — signs in with codex login --device-auth
Status dots — green means authenticated, red means login required, gray means the CLI is not installed
External Setup
You can connect external MCP clients to the same server over stdio: